
This tutorial will show you how to use GadgetsMenu on your server, as well as show you how you can easily configure this to be used with Tebex.
Another popular way of adding more content to servers is by adding extra cosmetics, often given as rewards ingame for taking part in events or sometimes as part of an ingame shop.
By the end of this tutorial, you will have a working cosmetic ingame shop that your players can purchase items from with ingame currency, or you can distribute them via the Tebex store. These cosmetics will be issued to your player automatically, so all you need to do is the initial configuration and then your new content will be ready to launch.
For this tutorial, we are using a 1.19.2 Spigot server on GTX Gaming, GadgetsMenu (free edition, though you may prefer the paid edition for extra content), LibsDisguises, ProtocolLib, LuckPerms, and Tebex. Other server hosts may differ slightly, but the instructions should be largely the same. For the purposes of our tutorial, we are using a schematic made by 2niau.
Make sure you are OP and have flying permissions, to make your life easier. To do this, go to your web console (on your server host), and type 'op <username>'. Ingame, change your personal gamemode to Creative by typing '/gamemode creative <username>'. For ease, your character can now easily fly (press double jump) and use OP commands.
Installation
Installation is very simple, download the .jar file from the link above, and go to your server host. Go to /File Manager and then /Plugins. Drag and drop your .jar file into the /Plugins folder, and either restart your server or /reload ingame.
Now we need to head ingame where we will first test and then configure our new cosmetic items. You will need this wiki going forward so you can configure your GadgetsMenu plugin to your liking.
Configuration
Ingame, simply type /gmenu main to bring up the ingame GUI for the plugin. Now is the time to test out the cosmetics and see how they look or what they do, and you should make notes on how you want to issue the cosmetics, via a reward or via currency or a mixture of both. Every server will be slightly different and you should look at what fits your server best.
How you implement the cosmetics into your server is entirely up to you, you could:
- Set permission nodes for each cosmetic and distribute via ingame rewards such as quests, event participation etc.
- Set permission nodes for each cosmetic and distribute them individually via the Tebex store.
- Set basic permission nodes and allow access to the cosmetics via the ingame currency.
You should now consider how you want to approach the distribution of cosmetics on your server. There is no right or wrong answer, the important thing is allowing your players a smooth and easy way to acquire cosmetics to add to their collection.
Ingame, you should type '/lp editor' and go to the Luck Perms web editor for easy configuration of permissions. Basic permissions that we should provide our default group (this is the group that all players on the server are in) are:
- gadgetsmenu.menuselector
- gadgetsmenu.mysteryboxes.open.*
- gadgetsmenu.animations.normal
There are two more permissions that you can give, if needed:
- gadgetsmenu.summonpet (Optional) - for premium version only
- gadgetsmenu.discount.default (Optional)
Save your changes, and test that non OP players are able to access the '/gmenu main' command and browse the ingame shop. As long as they can, we can continue to the next step.
If your morphs aren't displaying, you should check that 'TallSelfDisguises' is set to 'true' within the players.yml in the LibsDisguises folder.
For the full list of GadgetMenu permissions, this wiki will be essential. You should now move onto the section below that is relevant to you, either giving cosmetics as rewards, via Tebex, or via ingame currency.
Distributing Cosmetics Via Ingame Rewards
If you want to issue cosmetics via ingame rewards then a good way of doing this is via quest plugins. Provide questlines and interesting storyline play for your players to engage with, and at the end of the quest issue your player with the permission node for the cosmetic. There are many quest plugins out there, and you should spend some time researching one that is best for your needs.
Distributing Mystery Dust Via Tebex
You have two options for providing access to the new cosmetics through Tebex, either by using the commands to automate giving mystery dust, or by creating individual packages for each and every cosmetic and issuing them via permissions. The least amount of work will be to issue mystery dust, and then the customer can spend this how they like ingame.
If you were going to create a package to distribute mystery dust, you should use commands such as these:
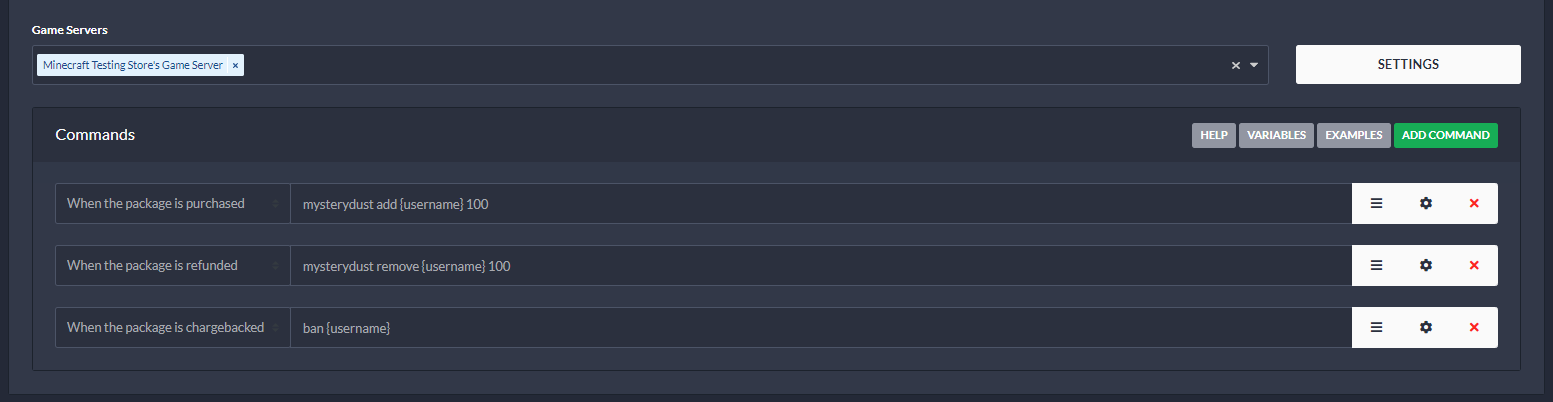
As you can see, we have used 'mysterydust add {username} 100' for our purchase command, and we've also configured refund commands as 'mysterydust remove {username} 100'. Our chargeback command will 'ban {username}' automatically. If we wanted to thank our customer, we could do so, by adding an additional command such as 'Thank you for your support <3 You've now received 100 mystery dust' using the appropriate /tell, /msg etc command that you would use on your server. Or, alternatively by using broadcast commands which will notify everyone - it's really up to you. For our server, we want this to remain private between us and the player (not every player wants their purchases to be public) so we're going to message.
When the package is purchased, the player will automatically receive the mystery dust for them to use ingame, on whatever they want, whenever they want.
Distributing Cosmetics Via Tebex
If you were going to issue the cosmetics one by one, then you would need to use a system such as LuckPerms and create permission groups for each cosmetic, assigning each group the relevant permission nodes. The end result would mean that customers will acquire the cosmetic directly from Tebex and bypass purchasing via the gmenu GUI.
We have created a permission group for 'cat', we have given the group no weighting, so it won't override any other ranks we have displaying ingame. To give the player the cat pet, we simply assign the permission node to the group. We created one for 'baby black cat'. We also gave the group a suffix of ', the mischievous', and we could use this in future if we wanted to.
The permission node we need is 'gadgetsmenu.pets.babyblackcat'. You could bundle your permission nodes together into several groups, or do them one by one, how you do it will very much depend on how you want your server to be, and no one can instruct you on the 'right' way, as it will be unique to your situation and your server.
We will go to Tebex now, and create a package for our black kitten pet. Create the package and add the necessary info, remembering to follow our guide for product descriptions, and in the command section, we need to type 'lp user {username} group add cat'. We should add refund and chargeback commands as well, and then we should test our package by creating a manual payment. It should work perfectly as intended, and you can now work on creating these groups and packages for each cosmetic the plugin provides.
Distributing Cosmetics Via Ingame Currency
After giving your default group the basic permissions needed to use the menu, very little is now needed in terms of further configuration.
Your players will be able to purchase items from the ingame /gmenu main GUI using Mystery Dust - this is the default currency of the GadgetsMenu plugin, though the plugin supports 3rd party currency so you can change this if you wanted to make this your default server currency. For our tutorial, we want to use Mystery Dust as it allows us to reward our players for ingame activities with a new currency and adds a little more depth to gameplay, as it can even be traded among players this also adds a new dimension to your economy (though you can restrict this if you want).
We will be able to reward players with Mystery Dust using the following command '/mysterydust add {username} <amount>', we would use this command, for example, to reward a player for taking part in an event, or whenever we want to manually issue the player with some bonus dust. Because mystery dust can also be given as quest rewards, you can also add this as an incentive to complete quest chains, therefore players will work to earn their cosmetic rewards by completing game content.
GadgetsMenu Mystery Box Rewards
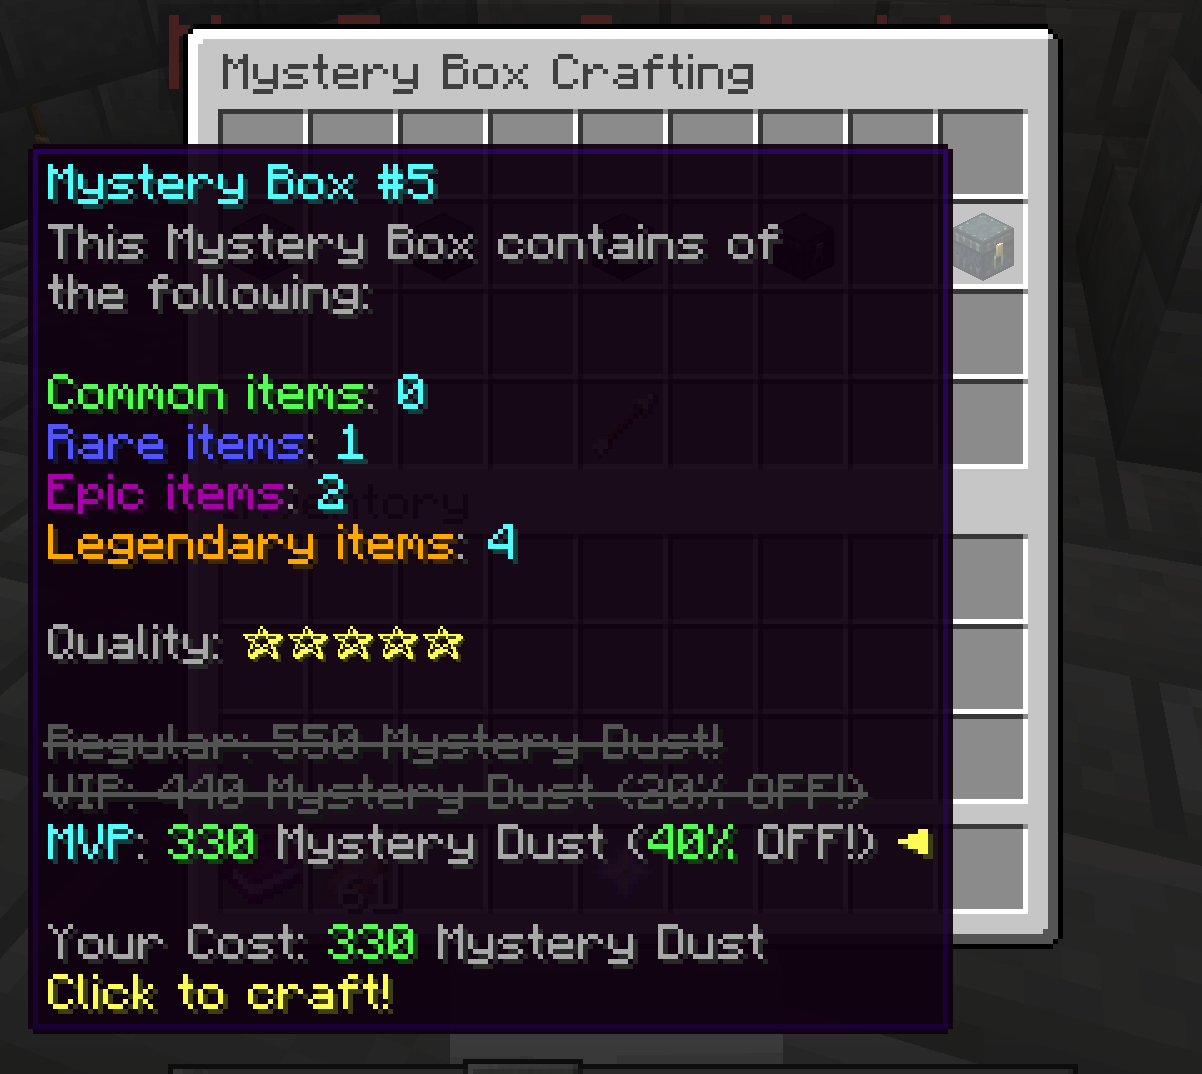
Another way of distributing rewards is via the plugins mystery box system. A fun reward system that will create some suspense over the cosmetics your players can receive. This would be fantastic for event rewards and quests, and will be an engaging way of distributing your cosmetics to players. You can configure the plugin further so that you can issue discounts on crafting mystery boxes depending on player rank, and players can even gift boxes to each other - a fun way for players to say thank you to their friends!
If you want to use mystery boxes on your server then you should first create a vault by using the command '/gmysteryboxes mode add-vault <vault name>' and you should also spend time reading the wiki for configuring the boxes and permissions, as this will be the subject of a different tutorial.
We'd recommend keeping mystery boxes to ingame rewards and not on the store, as you will not be able to apply for Paysafecard with mystery boxes for sale, but this is entirely your choice.
You can add tons of cosmetics to your server, and this tutorial has just shown how you can use one plugin. There are plenty of other plugins out there that might provide other fun things for your players to collect and use!
We hope this tutorial has helped you understand how you can set up cosmetics and how you can distribute them on your server. You may also find our other tutorials useful, such as how to create a custom fishing event, how to set up player ranks, and how to create your server spawn.
If you're brand new to Tebex you may find our getting started guide useful, and if you have any questions our friendly support team will be happy to help, just send them an email at support@tebex.io.