
This tutorial will walk you through how you can use the EssentialsX plugin on your server to compliment your Tebex integration. At the end of this tutorial, you should have the basics you need to begin crafting a system that helps automate your server and provides great quality of life benefits to your players.
EssentialsX provides you, the server admin, with many options and quality of life improvements on the base game that you can distribute to your players. Either through rewards ingame issued via a permission system such as LuckPerms, or via the Tebex plugin, you'll be able to add some depth to your Minecraft server and give your players both goals to strive towards and automate rewards freeing up your time for more important tasks, such as engaging with your community.
We're going to look at how you can use prefixes and suffixes for player names, which you can attribute to a permission group, for example, if you wanted to include a prefix in a rank. Our tutorial is based on a fictional RPG Minecraft server and we're going to create ranks in line with this theme.
Installation
Our tutorial is using a hosted Spigot 1.19.2 server on GTXGaming, and we're using the latest version of EssentialsX Core and EssentialsX Chat for 1.19.2, in addition to Vault. We're also going to be using LuckPerms for our permission system, and Tebex so we can easily automate what we're going to achieve. There are several Essentialsx modules you can also download for additional tools and quality of life benefits but we're going to focus on the Core and Chat modules for now. Instructions using other server hosts are likely to be very similar but there may be minor differences in panel layout.
To install, we simply take our downloaded jar files and go to our File Manager, and drop them into the /plugins folder. A quick restart or reload of our server and our plugins are now ready to use.
As you can see installation is very simple, and now we can begin working on some of the more interesting and fun stuff we can use this plugin for as well as what we can achieve with other plugins.
You should also make sure that you have made yourself OP. To do this, go to your web console (on your server host), and type 'op <username>'. Ingame, change your personal gamemode to Creative by typing '/gamemode creative <username>'. For ease, your character can now easily fly and use OP commands.
Luck Perms Configuration
If you want more info about LuckPerms you can also watch Ted's video here. For each rank or group, you want to have a prefix and/or suffix for, you'll need to configure this in LuckPerms. Simply adding this in LuckPerms isn't enough for this to show ingame, which is why we require additional plugins to make this work as it should. Ingame, type '/lp editor' and click the link that is printed to be taken to the web editor. The web editor is easy to use and can be far easier than writing command strings ingame.
We want to create a brand new group for the rank that we want. We can either issue this rank via the Tebex store or we could issue this rank after completing pre-requisite quests ingame, using a robust questing plugin such as Citizens. Our tutorial will be using the Tebex store, but have a think about the different ways that you can integrate a ranking system in your server.
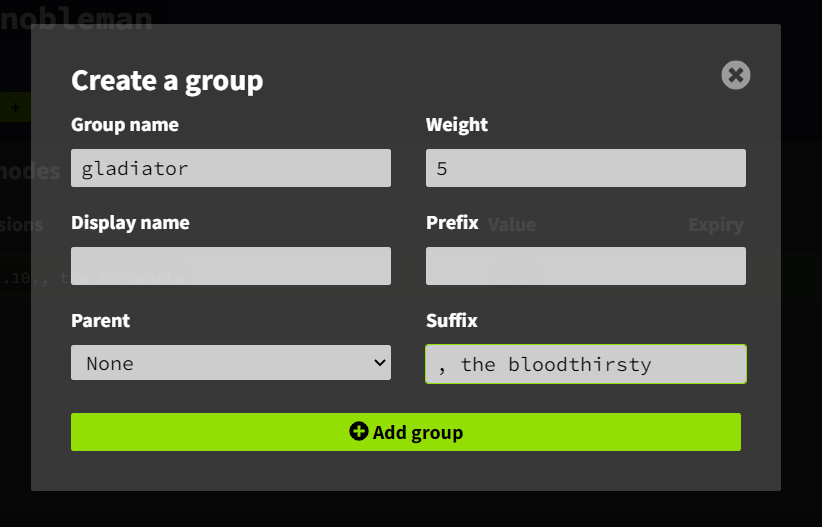
In the web editor, we'll create a new group by clicking the + icon next to groups. A modal will appear and you will be able to enter several options, and this is where we set our group name and our prefix/suffix. We're going to name this group 'squire' as we want our server to have an RPG theme. We're not going to set a prefix, but we do want to set a suffix, and we've put 'the curious'. Ingame, we want players with this rank to be displayed as 'Squire Notch the curious'. We need to set a weight for this group, and the suffix so we'll set a weight of 5. This is important because as players progress on your server they will be added into several groups, and we want the higher ranks to be displayed over the lower ones and the weighting will help with this.
Here's an example of what your LuckPerms group could look like when you make it:
Now our group is created and has been added to the default parent group we can add this group to a track if we want to. A track will make promoting and demoting along a linear ranking system easy if you need to do it at any time. Create your track by clicking the big + icon and then organise your groups in ascending order.
If we want our ranks to give specific permissions, such as being able to type in coloured text or, for example, to fly, we'd add them into our group using the web editor.
We're done with LuckPerms for now.
EssentialsX Configuration
On your server host, go to File Manager, /Plugins, and /Essentials. Open the config.yml. You'll see that the config file is quite large and there are tons of options available for you to configure to have better control over your server. We want to make some edits here so that our ranks in Luck Perms display in-game.
Using the search option in the config will make this much faster for you. You can search 'prefix', or head to around line 905, where you will see the section on formats. We're going to use this to change the display of every player depending on what group they are, and you would do this for each rank that exists on your server, for example, admin, owner, moderator, VIP, MVP etc. We've typed out how we want our player names to be displayed, and you'll find the helpful list of placeholders just above in the config file.
To make our ranks stand out ingame, we want to use colour codes. You should use this list of colour codes so you can make your ranks look awesome for your players to aim for. You may also find this wiki useful.
Because our server is going to be RPG based and we want a theme, we've made our ranks and titles accordingly:
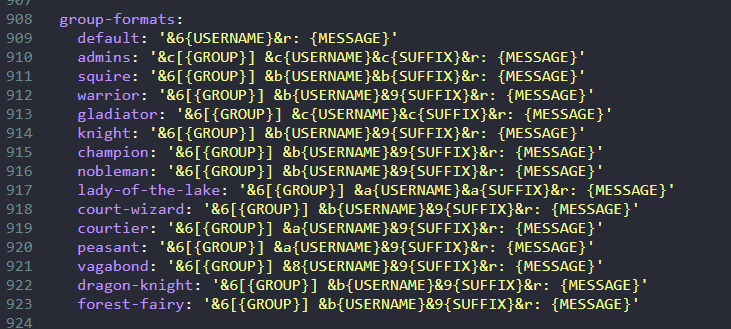
We want to display our group name, but that's just our preference. There are various options that you can use depending on how you want your rank to be displayed - you should test with the placeholders and see what you like the look of. Your group name needs to be an exact match of the name in your LuckPerms group for it to be detected.
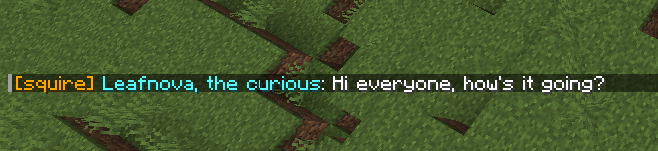
Here is what one of our ranks looks like ingame:
How To Distribute The Ranks Via Tebex
You can distribute ranks several ways, as we've mentioned previously, but for our tutorial, we're going to issue them via Tebex.
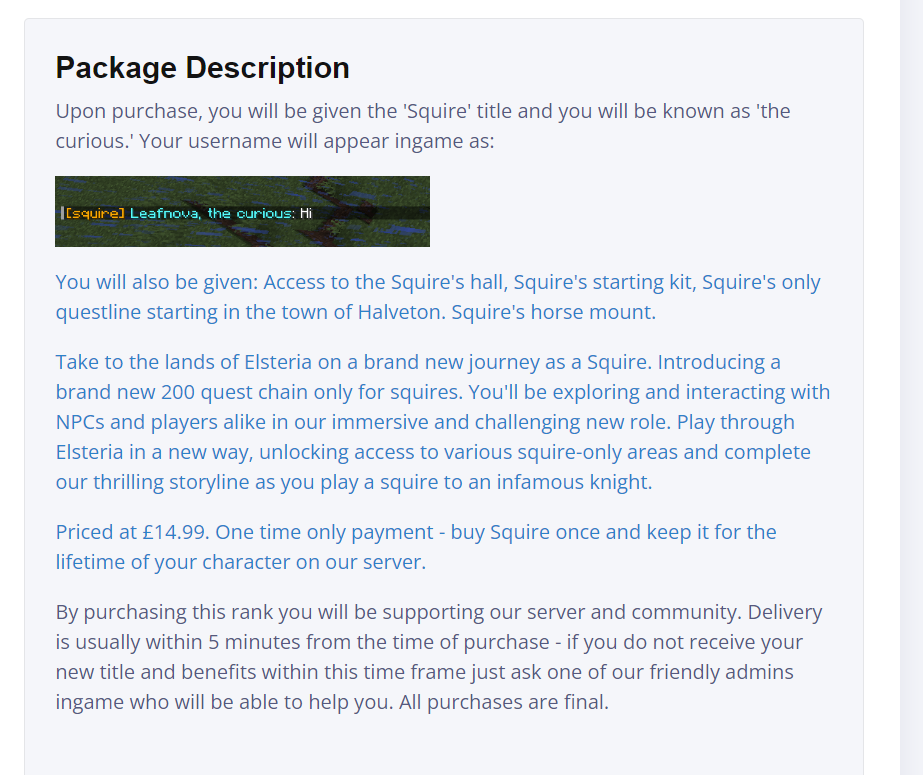
We need to create a new package for each rank and title that we want to distribute through Tebex. Go to Webstore > Packages and create a new package. You need to ensure that your package description provides the player with everything they need to know prior to purchase. Here's an example package we have created for one of our ranks:
When you are creating your packages, make sure you have read our post on how to write great product descriptions, it will help you make the most of your store.
Now let's look at how we're giving our ranks via commands in the package editor:
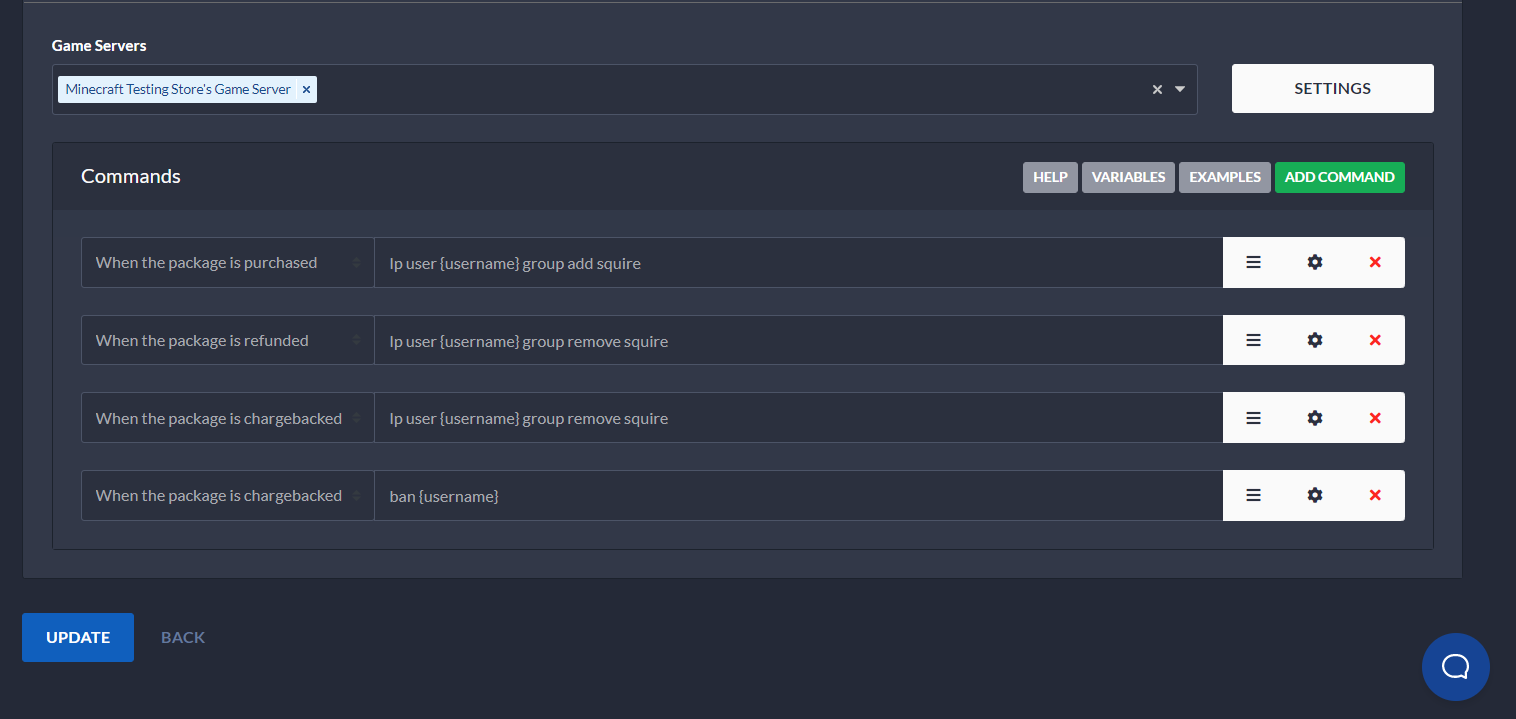
As you can see, we have added our command to give the rank when it is purchased, but we have also added some additional commands. These commands will be triggered when the product is refunded, or if the player charges back. This will automatically remove the rank from the player, and in the event of a chargeback, the player will be automatically banned from our server. You can user various variables for identifying the player, we're using {username} which is good for both Java and cross-platform servers. If you are using other types of servers, such as Bedrock only, you might want to use {uuid} - we'd recommend you read our article on variables here.
If we do a manual payment to test the package, we'll see that this works exactly as it should. Let's do this now. Go to Payments > Create Payment, and enter the username of your character, as well as the package you've just created.

It all went through perfectly, and our package is working as it should.
Other Customisations You Can Do On Your Server
When you are creating your server there are thousands of customisation options you can utilise. Here are a few ideas:
- Add quests - There are various plugins available for this, and we'd recommend testing them out until you are happy with the one you choose. Citizens is a good plugin that provides you with plenty of functionality and options.
- Add custom NPCs - Add custom text and dialogue, add custom traders, and make your world feel more alive.
- Add periodic events - Take our custom fishing event as an example. You could organise various events that recurr throughout the month so your calender has plenty for your players to choose from. These kinds of events keep your players engaged, and you can reward special ranks and rewards for taking part.
If you have followed our tutorial you should have a working rank with a prefix/suffix, and hopefully you've thought up some ideas for how you can use these to add goals and depth to your server. When you decide to launch a new rank, it may be a good idea to launch it with a sale, or a coupon, and to let your players know you have added something new via your social media.
We hope this tutorial has helped you create ranks on your server. If you're brand new to Tebex you may find our getting started guide useful, and if you have any questions our friendly support team will be happy to help, just send them an email at support@tebex.io.